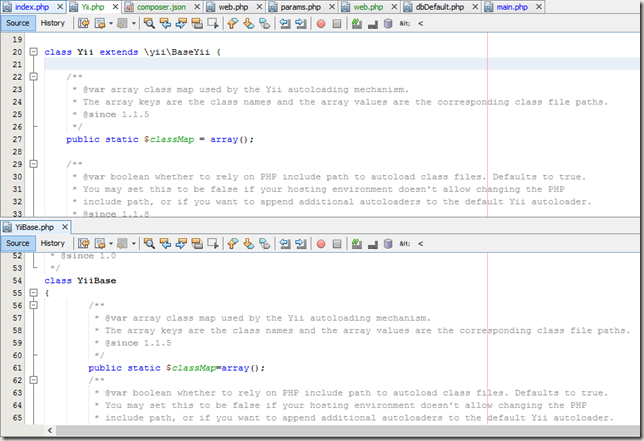
Catatan: Tutorial di bawah mengasumsikan bahwa komputer memang sudah dapat terinstall Yii2 secara normal dengan menggunakan composer
Bagi yang belum tahu, Yii2 bukanlah pengembangan lanjut dari Yii1. Hal ini mengakibatkan upgrade secara langsung dan mulus hampir mustahil. Salah satu opsi yang dapat diambil ialah melakukan migrasi secara perlahan dan bertahap. Salah satu caranya ialah dengan cara melakukan integrasi Yii2 ke aplikasi Yii1 yang telah jadi. Dengan demikian, pengembangan aplikasi selanjutnya sudah dapat menggunakan Yii2, namun tidak mengganggu fungsi yang telah berjalan pada Yii1.
Dengan dasar dari dokumentasi yii2, berikut adalah langkah-langkah yang perlu dilakukan untuk integrasi Yii2 ke Yii1:
- Install Yii2 dan komponen pendukungnya menggunakan composer dengan cara melakukan eksekusi perintah berikut:
composer global require "fxp/composer-asset-plugin:1.0.0-beta4"
composer require "yiisoft/yii2:*"
composer install - Di dalam folder protected/component, buat satu file dan beri nama Yii.php, isi dengan code berikut:
$yii2path = __DIR__ . '/../../vendor/yiisoft/yii2';
require($yii2path . '/BaseYii.php'); // Yii 2.x

$yii1path = $yii1path = __DIR__ . '/../../fw';
require($yii1path . '/YiiBase.php'); // Yii 1.x

class Yii extends \yii\BaseYii
{
    // copy-paste the code from YiiBase (1.x) here
}

Yii::$classMap = include($yii2path . '/classes.php');
// register Yii2 autoloader via Yii1
Yii::registerAutoloader(['Yii', 'autoload']);
// create the dependency injection container
Yii::$container = new yii\di\Container;
Sesuaikan isi variable $yii2path agar mengarah ke folder framework yii2 yang berisi file BaseYii.php dan $yii1path agar mengarah ke folder framework yii1 yang bersi file YiiBase.php. Selanjutnya salin isi dari class Yii pada file YiiBase.php agar masuk ke dalam area // copy-paste the code from YiiBase (1.x) here
- Sesuaikan file index.php yang merupakan entry-point aplikasi Yii1 agar menjadi seperti berikut:
// remove the following lines when in production mode defined('YII_DEBUG') or define('YII_DEBUG', true); defined('YII_TRACE_LEVEL') or define('YII_TRACE_LEVEL', 3); // include the customized Yii class described below require(__DIR__ . '/protected/components/Yii.php'); // configuration for Yii 2 application $yii2Config = require(dirname(__FILE__) . '/protected/config/web.php'); new yii\web\Application($yii2Config); // Do NOT call run() // configuration for Yii 1 application $yii1Config = require(dirname(__FILE__) . '/protected/config/main.php'); Yii::createWebApplication($yii1Config)->run(); - Di dalam folder protected/config, siapkan file konfigurasi untuk Yii2, dalam hal ini akan menggunakan nama file web.php. Adapun isinya lebih kurang sebagai berikut:
<?php
$params = require(__DIR__ . '/params.php');
$config = [
    'id' => 'basic',
    'basePath' => dirname(__DIR__),
    'bootstrap' => ['log'],
    'components' => [
        'request' => [
            // !!! insert a secret key in the following (if it is empty) - this is required by cookie validation
            'cookieValidationKey' => '',
        ],
        'cache' => [
            'class' => 'yii\caching\FileCache',
        ],
        'errorHandler' => [
            'errorAction' => 'site/error',
        ],
        'mailer' => [
            'class' => 'yii\swiftmailer\Mailer',
            // send all mails to a file by default. You have to set
            // 'useFileTransport' to false and configure a transport
            // for the mailer to send real emails.
            'useFileTransport' => true,
        ],
        'log' => [
            'logger' => Yii::createObject('yii\log\Logger'),
            'traceLevel' => YII_DEBUG ? 3 : 0,
            'targets' => [
                [
                    'class' => 'yii\log\FileTarget',
                    'levels' => ['error', 'warning'],
                ],
            ],
        ],
        'urlManager' => [
            'enablePrettyUrl' => true,
        ],
        'db' => require(__DIR__ . '/dbDefault.php'),
    ],
    'params' => $params,
];

if (YII_ENV_DEV) {
    // configuration adjustments for 'dev' environment
    $config['bootstrap'][] = 'debug';
    $config['modules']['debug'] = 'yii\debug\Module';

    $config['bootstrap'][] = 'gii';
    $config['modules']['gii'] = [
        'class' => 'yii\gii\Module',
            //'allowedIPs' => ['*']
    ];
}

return $config;
Happy coding !

